Declarative Lookup Rollup Summaries In Salesforce – The Why & How

The purpose of this blog post is to detail the benefits of using the Declarative Lookup Rollup Summaries (DLRS) managed package in your Salesforce org.

The purpose of this blog post is to detail the benefits of using the Declarative Lookup Rollup Summaries (DLRS) managed package in your Salesforce org, while also introducing the reader to some important Salesforce concepts. You will gain a high level overview about the problems that Declarative Lookup Rollup Summaries can solve, the Salesforce AppExchange, execute anonymous in the Developer Console, the Schema Builder, what managed packages are, the different types of Salesforce object relationships, the Workbench tool and the Salesforce IdeaExchange. The type of reader who would gain the most benefit from this guide is  a Salesforce admin who is interested in more advanced admin and beginner Apex code. It is also useful to someone quite new to Salesforce who would like to gain a high level overview of different Salesforce concepts.

What Are Rollup Summary Fields?

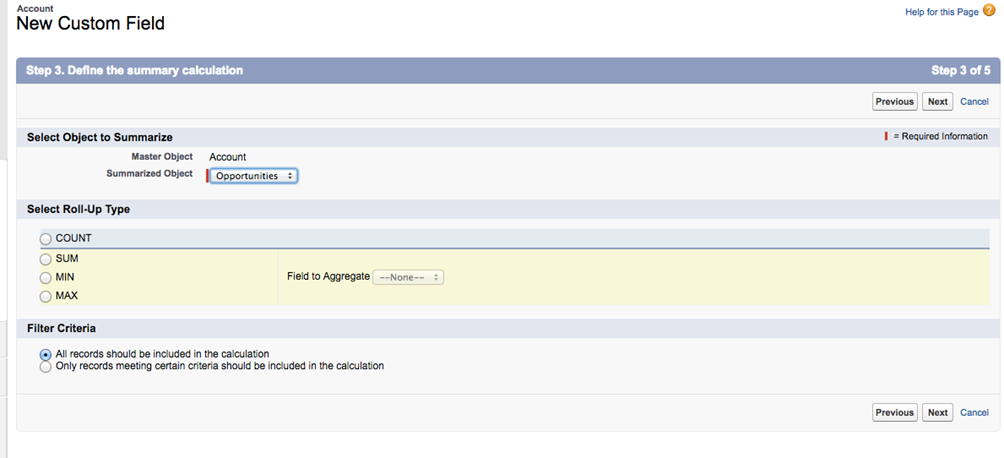
A rollup summary field displays the sum, minimum, or maximum value of a field in a related list or the record count of all records listed in a related list.
Declarative Lookup Rollup Summaries new custom fields

For example, if you want to display the number of opportunities that each account has, you can achieve this with a rollup summary field on the Account object. Similarly, if you want to display the sum of all the opportunity amounts per account, a rollup summary field can be used to accomplish this. Rollup summary fields are very helpful because they give high level information that you might need. They can be referenced in reports and dashboards, too.

Rollup summary fields are re-calculated whenever a value has been changed for a field on the child object that is being aggregated. There is a soft limit of 25 rollup summary fields per object but that can be increased to 40, as per this Salesforce article. It is not recommended to go beyond 25, as the more rollup summary fields you create, the more complex the org can become. For example, if you have some apex code that references rollup summary fields, you may experience lock row errors.

Rollup Summary Field Limitations

One of the key considerations for rollup summary fields is that they only work on objects that have a Master – Detail relationship. For example, there exists a de-facto Master – Detail relationship between Account and Opportunity* hence, one can create rollup summary fields in this use case on the parent (account) object. Because of this, rollup summary fields won’t work on objects that share a lookup relationship.

*A further point on this: although if you navigate to Setup | Schema Builder and select ‘Account’ and ‘Opportunity’ you would see a lookup relationship, the relationship between Account and Opportunity actually acts as a Master – Detail one. For example, if an account is deleted then all of the related opportunities will also be deleted. The Account and Opportunity relationship is a special one and the uniqueness of it is emphasised more in this answer on Salesforce StackExchange; which is a great resource for Salesforce related questions and answers.

This is a frustration for many Salesforce customers. In fact, on the Salesforce IdeaExchange, this idea to have rollup summary fields work between objects that share a lookup relationship has over 16,000 points!

Declarative Lookup Rollup Summaries idea details

The Salesforce IdeaExchange

The Salesforce IdeaExchange is where Salesforce customers can post suggestions to improve the platform. One of the ways in which Salesforce prioritises enhancements and new features is based on the number of votes for a particular idea and, since 16,000 up votes is very significant, hopefully Salesforce look at this idea fairly soon.

However, until then, the Declarative Lookup Rollup Summaries solution can be used to not only do roll ups on lookups but also can be used to perform more advanced calculations on master-detail relationships than the standard rollup summary fields.

Rollup Helper

Before we go into DLRS in more detail, it’s worth pointing out that there is another app solution that can be used called ‘Rollup Helper’. As you can see from its AppExchange reviews, it is a highly rated solution but one of the downsides is that the free version only works for 3 different relationships whereas there isn’t a limit with DLRS.

Declarative Lookup Rollup Summaries rollup helper


Salesforce AppExchange

The Salesforce AppExchange is essentially the Salesforce version of the Apple App Store. All apps that are hosted on the Salesforce AppExchange have gone through a comprehensive security check by Salesforce. The Salesforce AppExchange is oftentimes a first port of call for trying to answer a ‘should we build it or buy it’ question. For example, one could of course develop Apex code to do calculations between lookup relationships however, there are a number of factors to consider (developer resources, code maintainability and technical debt etc) that, generally, tends to favour leveraging an app if possible as a more lower cost, quicker solution.

Apps that you install from the Salesforce AppExchange will generally be managed packages – this means that you won’t be able to see the source code and that the meta-data from these packages don’t contribute towards your Salesforce limits. You will learn more about this later in this guide.

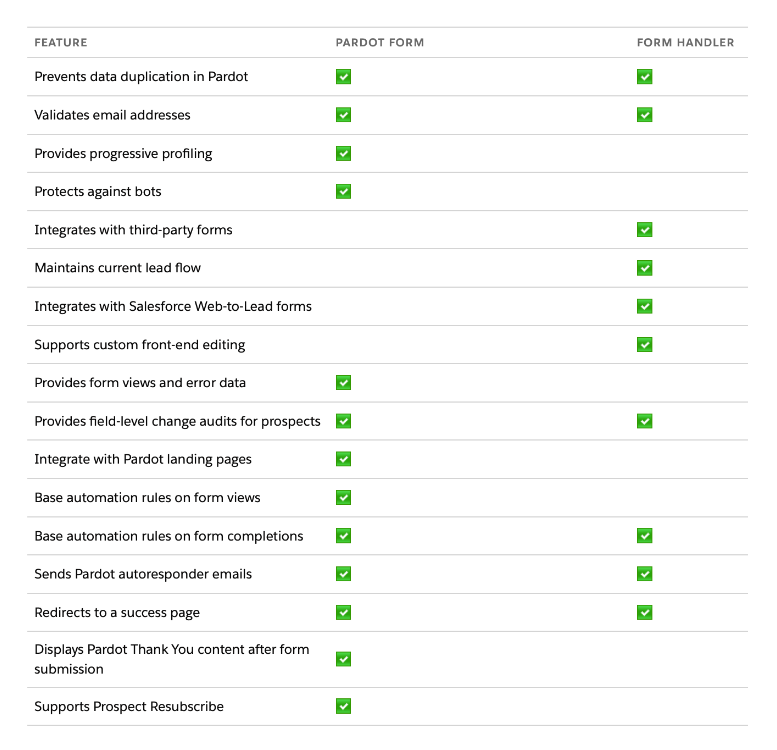
pardot forms vs comparison tables graphic

Benefits of Using Pardot Forms

1) Better Data Analysis

Whilst Pardot Form Handler reports submissions and conversions, there are limitations to the amount of data you can glean from the tool. On the other hand, Pardot Forms tracks additional statistics – views, form errors, incomplete submissions, and even how many people viewed the ‘thank you’ page. With these extra details, businesses can gain a far better understanding of how their customer base is interacting with their forms.

2) Customisation Options

If your form isn’t generating as many submissions as you would like, it can be time-consuming to troubleshoot issues if you don’t know exactly what’s causing them. Pardot Forms give you a better insight into form performance and which features could be improved. Increased customisation options mean Pardot users can quickly make alterations to the layout of their forms, such as changing the CTA’s, reducing the number of fields, and enabling dynamic progressive profiling features to build up customer prospect profiles over time.

3) Bot Protection

Bots can be used by bad actors to steal private information and carry out attacks on websites. In the case of webpage forms, they can create spam submissions which can waste time and money for businesses. Fortunately, all Pardot forms have built-in bot protection and CAPTCHA capabilities. There are also options for different levels of authenticators, giving users tailored protection options for their webpages.

Benefits of Using Pardot Form Handlers

1) Implementation

In the case of Pardot Form Handler, this implementation is relatively straightforward, as the form is hosted directly on the website and data is sent only once a form submission is successfully made. The majority of the workload of styling and formatting the form is all done on the website and is usually completed by a web developer familiar with basic HTML and CSS.

A Pardot Form on the other hand use an iFrame (inline frame), which loads another HTML element within the existing page. This means the customisation, styling and edits to the form are all handled in Pardots. This can make creating and updating new forms quicker for marketing teams.

2) Sensitive Information

Not all businesses collect the same information. Whereas it might be beneficial for one company to collect the location data of their customers, another might require confidential or sensitive information – passwords or financial information. In cases such as these, the collection of this information by Pardot might not be necessary, so using a form handler to store only the data you need could be a better decision.

3) iFrame and Google Analytics

Although Pardot Forms collects additional data about how users interact with a form, because the form is located in a separate domain from the main website (using an iFrame), when the user fills out the form, the session and tracking data for GA4 is lost. This means that some extra configuration is needed to push the GA4 event from iFrame into the parent domain. Working with a Pardot partner such as M4B can help with conversion tracking of your Pardot forms iFrames. With Form Handlers, this extra configuration isn’t required because the form is located on the actual website where your GA4 tracking is already running.

Decision Time

For businesses looking for a hassle-free way of tracking successful form submissions whilst also keeping the same website styling and formatting, continuing with Pardot Form Handler is usually easier than setting up Pardot Forms, despite the additional analytics and protections it offers. However, for companies which prioritise a more in-depth look at their form data over customisation options, Pardot Forms is the way to go. Ultimately, it comes down to which features a business thinks it realistically needs.

If you need guidance to get to grips with Pardot, Google Analytics, or iFrames, we can help. Contact our experienced team today and find out how we can boost your business with Pardot support services.

Installing The Declarative Lookup Rollup Summaries App

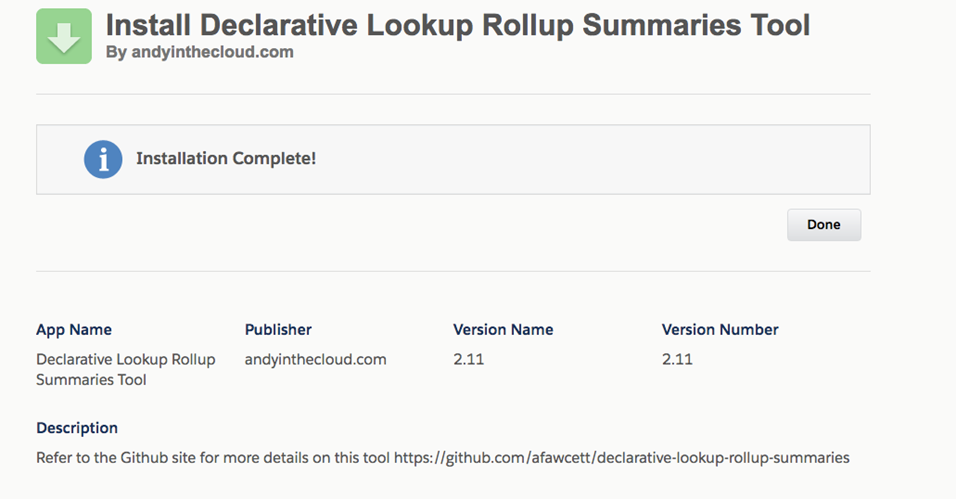
Now that we know about what rollup summary fields are and their limitations, let’s go into more detail about Declarative Lookup Rollup Summaries. This app was created by Andrew Fawcett, who is very well known within the Salesforce community. To install the app in your org, navigate to its GitHub page and click on the latest version and select the relevant org (whether you want to install in Production or sandbox).

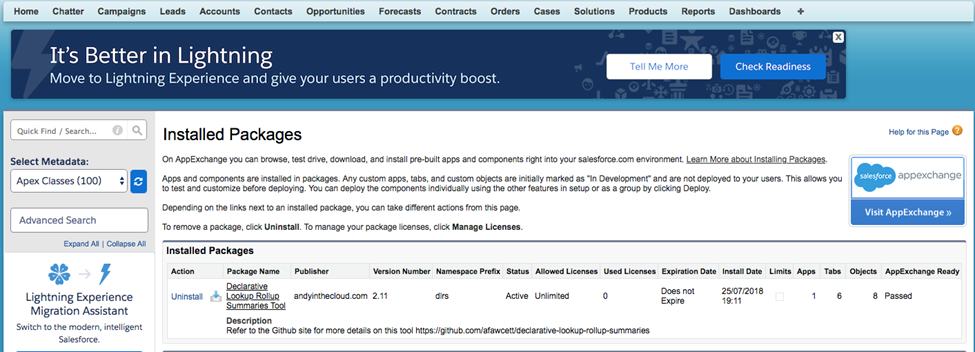
salesforce lightning installed packages

I recommend that you first test this app out with a Salesforce Developer edition org. This is a full version of Salesforce, free for life, but limited to 10MB of data storage and 2 licenses only. Having installed the app, you can navigate to Setup | Installed Packages. Here, you will find a full list of all the apps that you have installed in your Salesforce org.

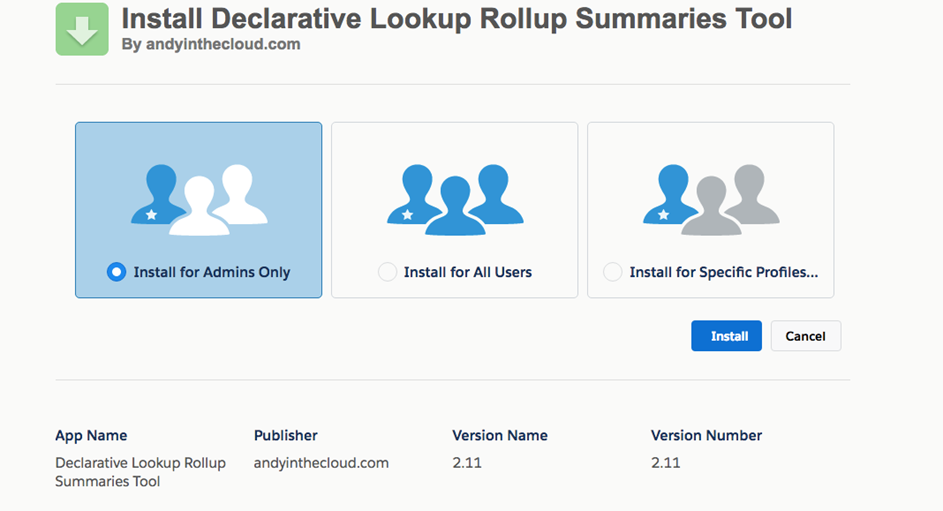
lookup rollup installation for admins
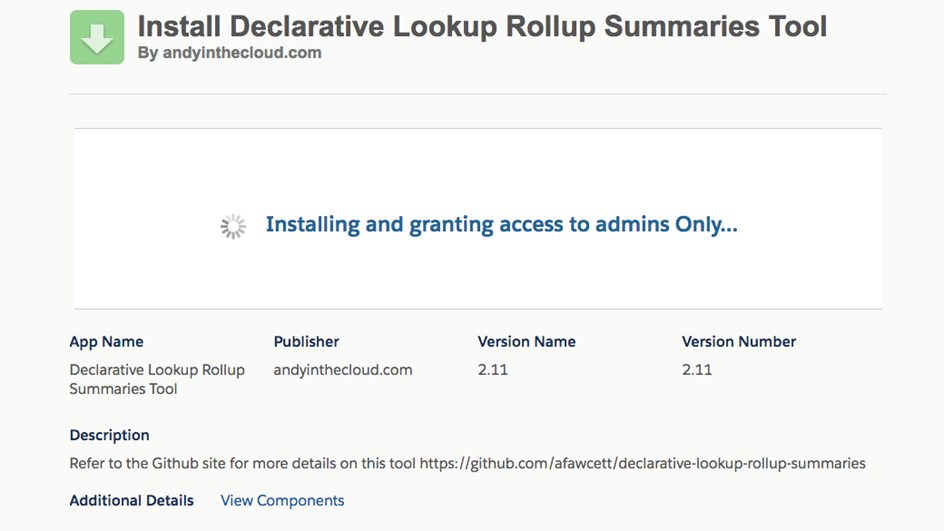
installing declarative lookup rollup summaries tool
install declarative lookup rollup tools

You can now select the ‘+’ sign on the far right of the tab bar to expand the tabs.

salesforce all tabs

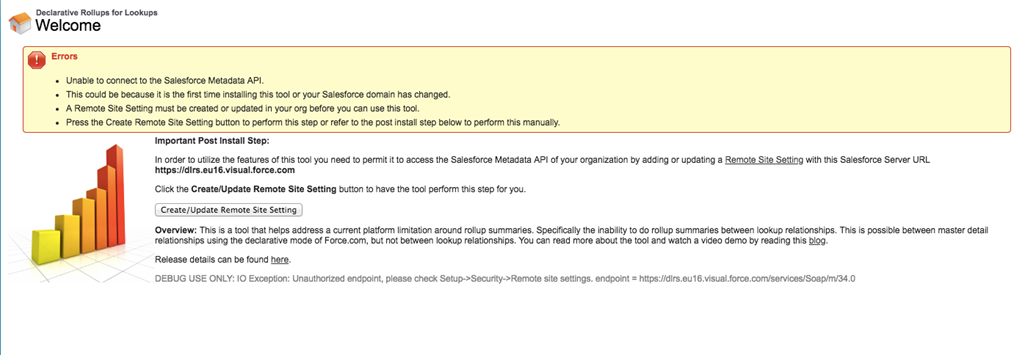
Upon select ‘Lookup Rollup Summaries’, you can see that you will need to create a Remote Site Setting by clicking the button. A remote site setting is a prerequisite when connecting a web address to Salesforce. Just an FYI that a slightly more scalable approach to specifying web addresses that can connect to your Salesforce org is to leverage named credentials.

declarative rollups for lookups

Having set up the remote site setting via the button click, you will see the below page:

remote sites

To proceed with your first Declarative Lookup Rollup Summaries, click the ‘Continue’ button that is placed on the bottom right of the page. You will then be navigated to the ‘Lookup Rollup Summaries’ tab page.

recent lookup rollup summaries

Leveraging DLRS for Master – Detail relationships

Although one of the most common use cases for Declarative Lookup Rollup Summaries is to have an easy, fast and declarative way to create a rollup summary field effect between Salesforce objects that share a lookup relationship, sometimes it is advantageous to leverage DLRS between Master – Detail relationships too if you want a particular calculation type that the standard Salesforce rollup field doesn’t provide.

For example, as we saw in the ‘What are rollup summary fields?’ section, the number of calculations for the standard rollup field is quite limited. However, DLRS offers a large number of different calculation type options:

rollup details & text rollups

Let’s say that wanted to have a field on the Account object that species the average opportunity amount. You could achieve this with DLRS but not with the standard Salesforce rollup summary field. Of course, you could also achieve this with Apex code but that option might not be suitable for all companies as it has a dependency on developer resources.

To demonstrate how to create a DLRS for displaying the average opportunity amount on the Account object, we’ll follow the steps below:

1.)

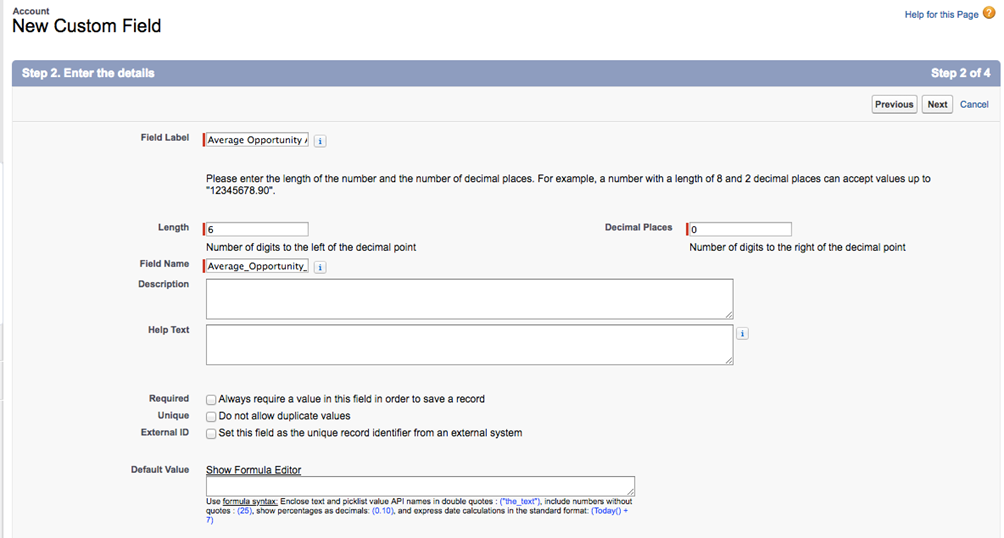
Create a number field on the Account object called ‘Average Opportunity Amount’. Make the length 6. Then select ‘Next’, ‘Next’ again and finally ‘Save’. This field will serve as the ‘Aggregate Result Field’; which stores the result of the DLRS on the parent object.

custom fields
2)

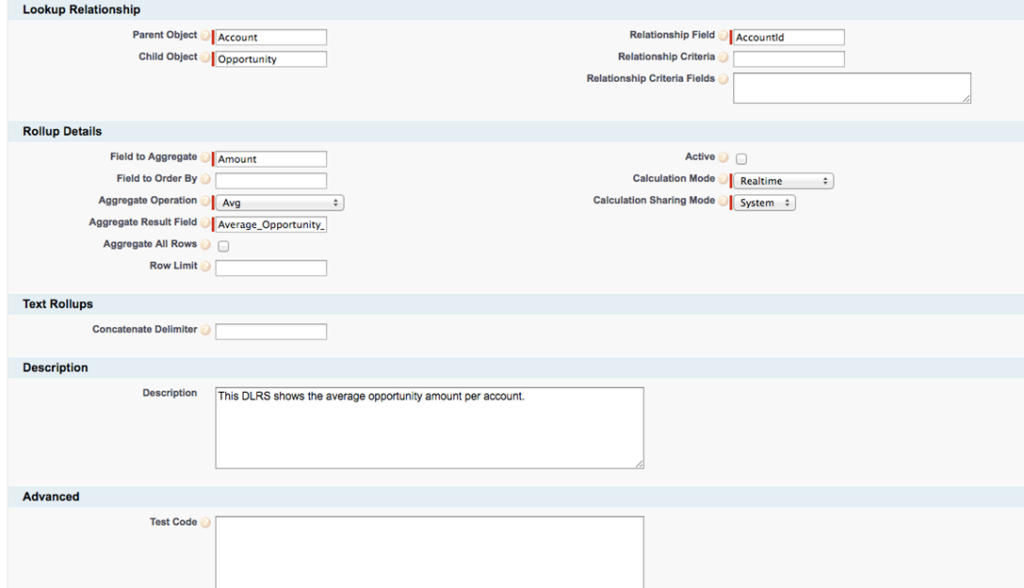
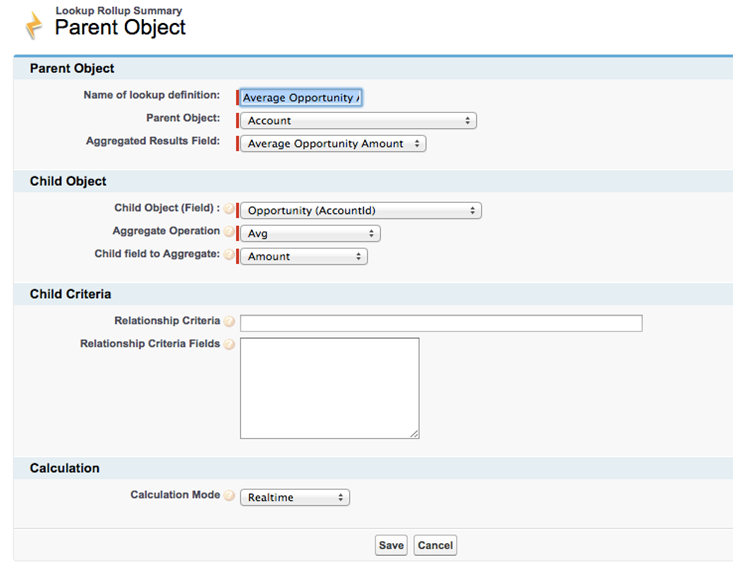
Now, go back to the Declarative Lookup Rollup Summaries tab and select ‘New’ and populate the fields with the below info:

The tooltips give more detail about the purpose of each field. Make sure you select ‘Avg’ as the aggregation operation. Note: you will have to leave the Declarative Lookup Rollup Summaries inactive for now. Finally, the ‘Relationship Field’ should be populated with ‘AccountId’ and not ‘Account’.

soql workbench query

You can use Workbench and select ‘queries | SOQL Query’ to see the fields available for an object. This is a helpful tool in many ways. Most importantly, it makes it easy to see the exact API name of relationship fields on a particular object.

apex lookup relationships
3)

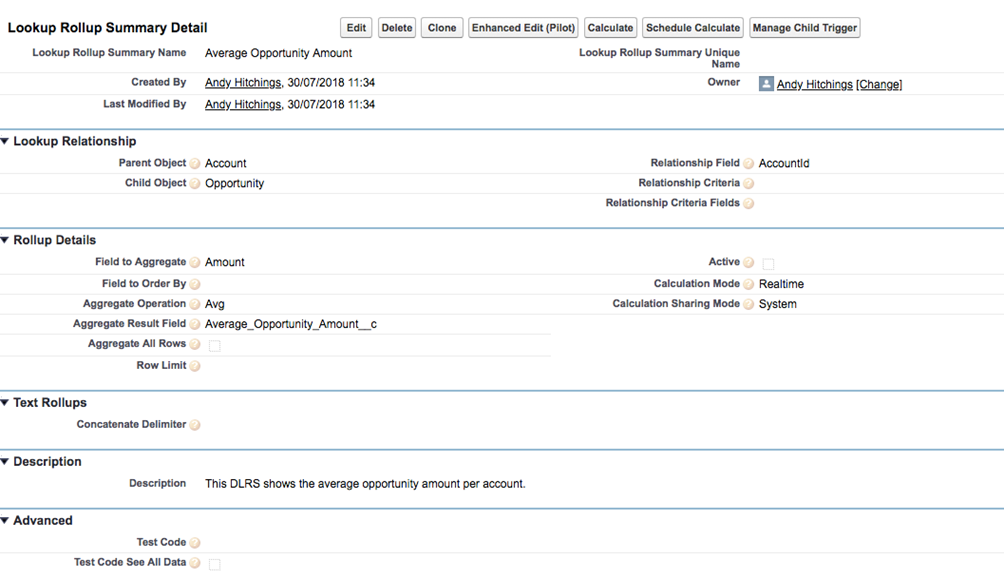
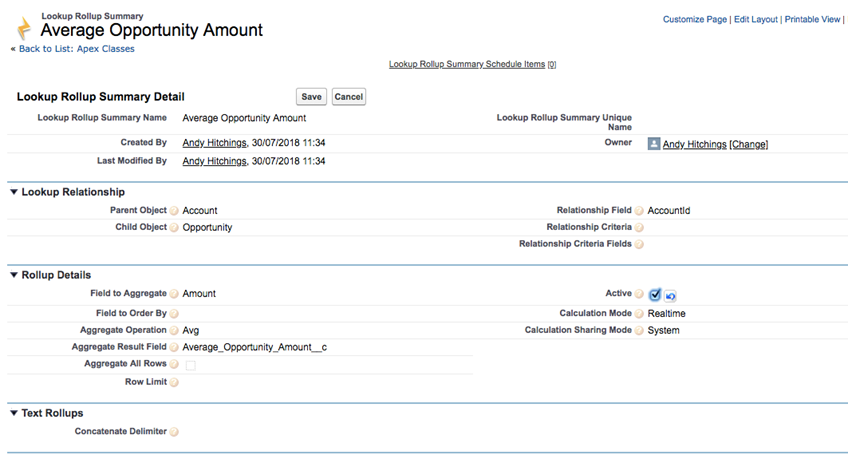
Having selected ‘Save’, your Declarative Lookup Rollup Summaries will look like this now:

apex lookup summary

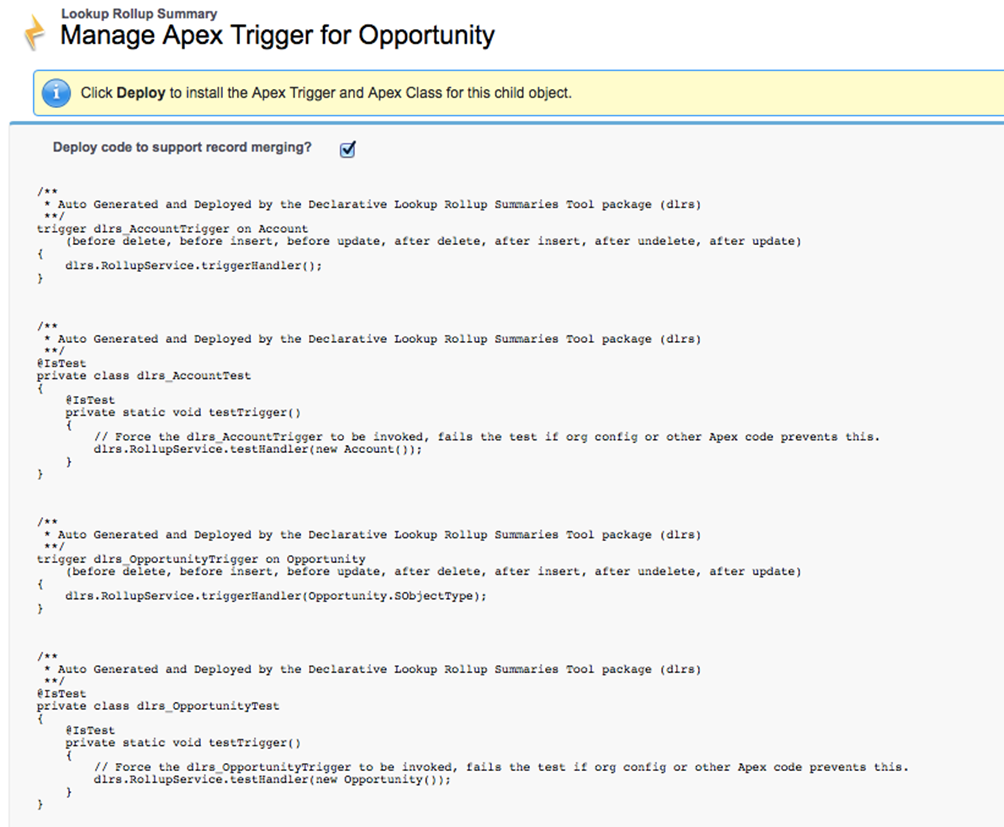
Before you can make Declarative Lookup Rollup Summaries active, you must select ‘Manage Child Trigger’ first. This deploys auto-generated code into your org to handle the DLRS calculation. Scroll to the bottom of the page and select ‘Deploy’.

apex trigger lookup rollup summary

It will take a few minutes to deploy the code before a success message like the below appears:

apex trigger opportunities
4)

The auto-generation of the code is made possible because of the Salesforce meta-data API. This is the API that is used for deploying meta-data to an org.

An interesting thing to point out is that, since Summer ’18, the soft limit for the amount of Apex in a single org is now 6MB. The auto-generated code will contribute to that limit. However, the helper classes that are called in the auto-generated triggers will not, as they are part of the managed package. Managed packages don’t contribute towards the limits of a Salesforce org.

To see the amount of Apex you have written, and have left in your org, navigate to Setup | Develop | Apex Classes.

apex classes

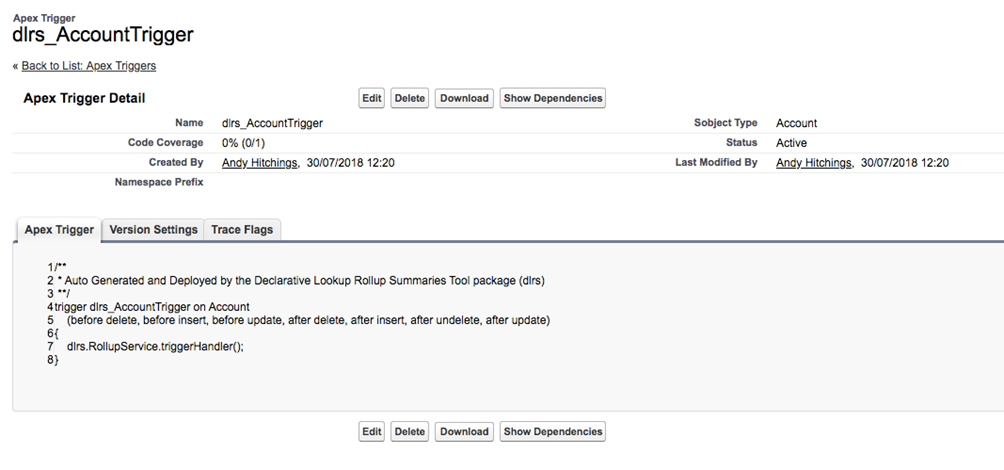
Let’s navigate to one of the triggers that was auto-generated. Let’s go to Setup | Develop | Apex Triggers and select one of the triggers:

apex trigger detail

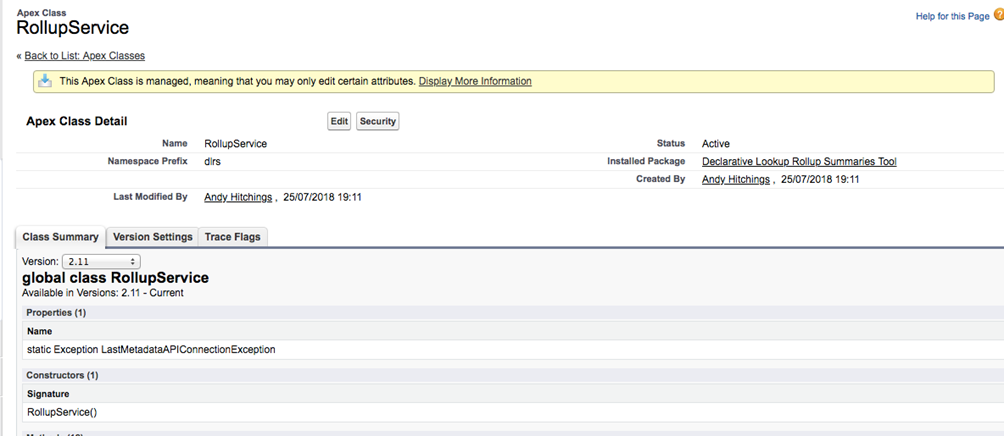
Here, we can see that for all the execution contexts, the triggerHandler method in the RollupService helper class is called. If we navigate to that class, we see the following message:

apex class details

So, for managed packages that you install, you won’t be able to see the source code.

5)

Now, let’s go back to the Declarative Lookup Rollup Summaries that was created. You will now be able to activate it by editing the ‘Active’ checkbox:

average opportunity amount salesforce

It’s worth pointing out that by clicking on the ‘Enhanced Edit (Pilot)’ button, you will have an option to specify the exact data-set that should be considered for calculation. For example, you might only want to calculate the average sum of Opportunities that belong to a subset of owners or where the amount is greater than 200. You can specify that by inputting a SOQL statement in the ‘Relationship Criteria’ field. At a high level, SOQL is the Salesforce version of SQL; you can query the Salesforce database with this language.

This feature is the equivalent of ‘filter criteria’ for the standard Salesforce rollup summary fields:

parent objective lookup rollup salesforce
6)

Now that we have created a DLRS, we want to check that we have opportunity and account data to demonstrate that it works. If you are in a sandbox environment (ideally, you should always create a DLRS first in sandbox first instead of production) and you already have opportunity and account data, you can skip this step.

If you are in a developer environment, you’ll have some account and opportunity records out-of-the-box already. But, you might want to create some more records. You can do this manually or via a .csv file and the Salesforce Data Loader or another ETL tool. However, in this example, we’ll leverage execute anonymous with the Salesforce Developer console.

Execute Anonymous

Execute anonymous is where you can write Apex code in a script format to quickly perform DML operations. For a small number of records, it might be quicker to write an execute anonymous script than for creating a .csv file for a batch insert/update. However, it’s generally considered best practice to use the Data Loader instead. Using execute anonymous is riskier if you aren’t comfortable with it because it’s easier to make a mistake. The reason for covering execute anonymous in more detail in this guide is to introduce the reader more to Apex.

Select your name in the top right, click on the arrow and select ‘Developer Console’. To open up execute anonymous: select the cmd button (mac) / ctrl (windows) and ‘e’. Alternately, you can navigate to it via ‘Debug’ in the toolbar of the console.

execute anonymous window

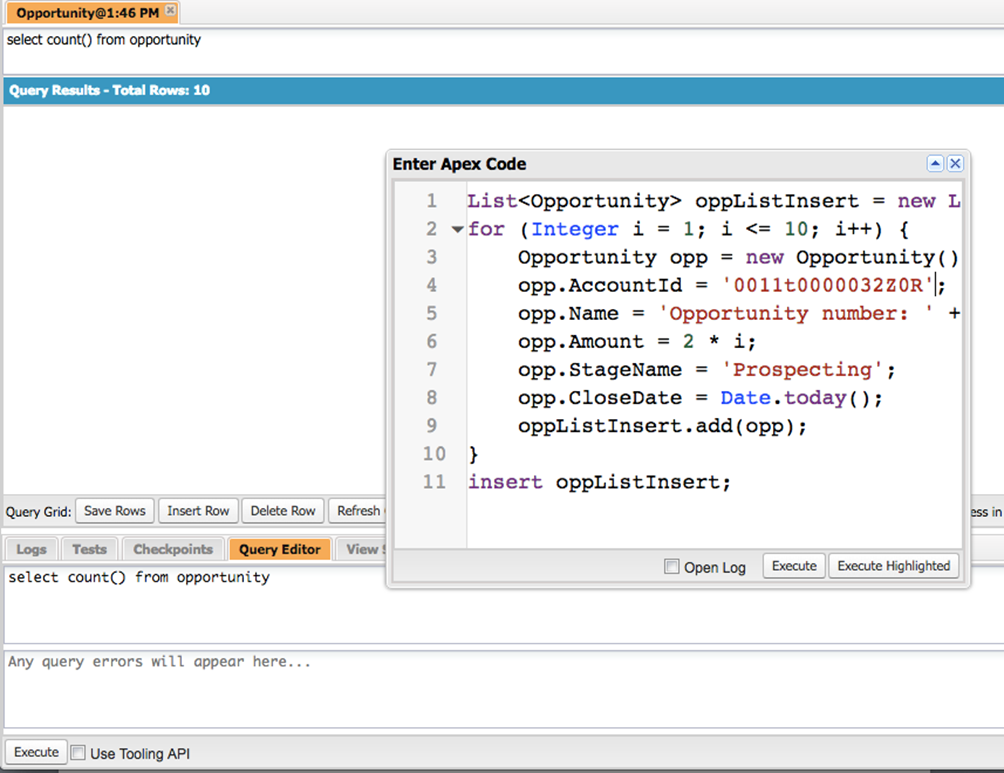
Now, copy and paste the below into the window:

List oppListInsert = new List();
for (Integer i = 1; i <= 10; i++) {
    Opportunity opp = new Opportunity();
    opp.AccountId = ‘ANACCOUNTID’;
    opp.Name = ‘Opportunity number: ‘ + i;
    opp.Amount = 2 * i;
    opp.StageName = ‘Prospecting’;
    opp.CloseDate = Date.today();
    oppListInsert.add(opp);
}
insert oppListInsert;

Replace ‘ANACCOUNTID’ with the 15 or 18 character Id of an account record. Account record ids always start with ‘001’. The first three characters of a record Id for standard objects are deterministic.

You can see the full list here.
opportunity results salesforce

Run Calculate Job

To find the id of a record, you can either perform a query via Developer Console, Workbench or another tool (Eclipse etc). However, the simplest way is to navigate to a record and copy and paste the record Id from the URL.

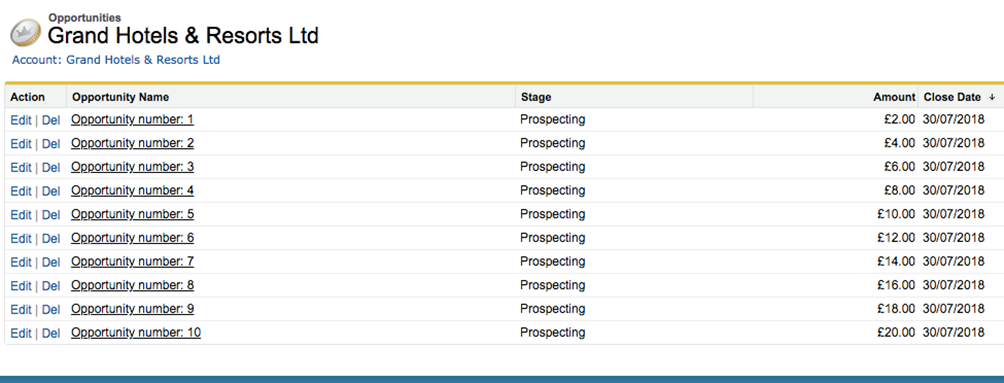
Then select ‘Execute’ to perform the DML operation. This will create 10 opportunities against the account record that you specify. To confirm that the records were created successfully, you can always perform a count() SOQL operation from the developer console too via the ‘Query Editor’.

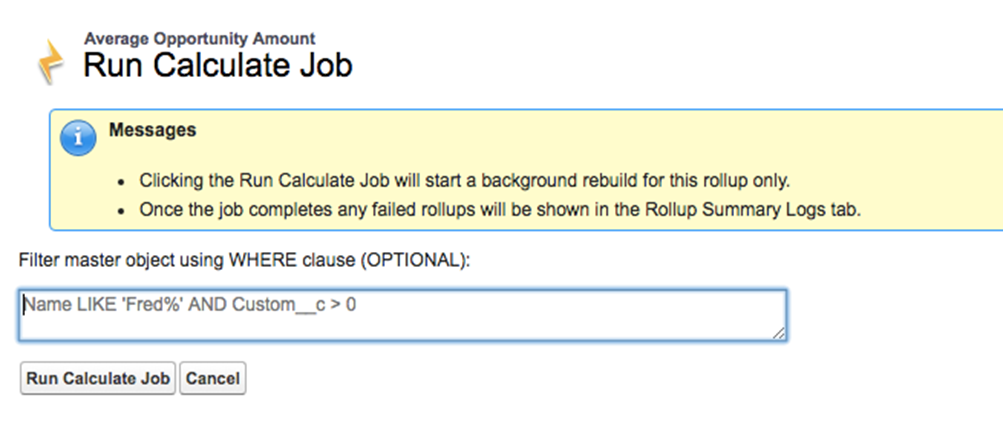
Now, navigate back to the DLRS that was created and select ‘Calculate’. You will see a page like this; which is where you can specify the filter criteria. Let’s leave this blank for now and select ‘Run Calculate Job’.

run calculate job salesforce

This will initiate the calculation. In other words, Declarative Lookup Rollup Summaries will populate the Average Opportunity Amount field on the Account object based on the average opportunity amount. If the DLRS is performing a calculation on a large data set, then if you go back to all tabs and select Lookup Rollup Calculate Jobs, a line entry will appear there and once the calculation has finished, it will disappear. In this example, because the data set (only 10 records) was very small, the calculation was almost immediate.

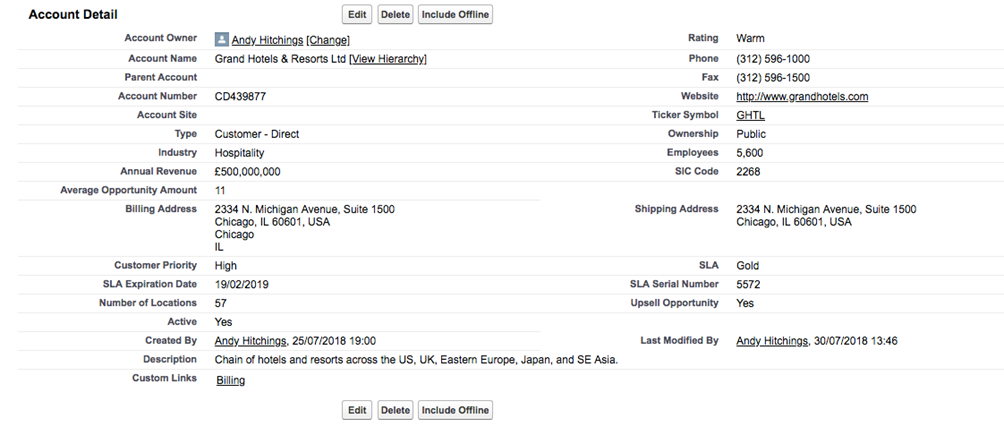
Now, the Average Opportunity Amount is £11. However, if we edit the amount of one of the opportunities, because the DLRS has the calculation mode of ‘realtime’, then after the edit, the DLRS will re-run.

declarative lookup rollup set up

Let’s give this a try, so let’s change the £20 value opportunity (Opportunity number: 10) to £50. Navigating back to the account (in this example, it is ‘Grand Hotels & Resorts Ltd), the average amount has changed immediately to £14.

grand hotels and resorts ldt prospecting stages
billing address information salesforce

Leveraging Declarative Lookup Rollup Summaries For Lookup relationships

To create a DLRS between objects that share a lookup relationship, the exact same aforementioned steps would be completed. In this way, you can create DLRS quickly and easily without the need to write your own code.

Another benefit is that, should you need to de-activate the Declarative Lookup Rollup Summaries, it is as easy as changing the ‘active’ flag. Whereas, unless a trigger references a custom setting, one would have to re-deploy the trigger; which is much more time costly and also has a dependency on a developer resource.

Conclusion

The DLRS is a very helpful Salesforce app that can be of especial benefit to Salesforce administrators for more complicated rollup summary fields for master – detail relationships and also for lookup relationships. To find out more, contact our certified Salesforce consultants. 

Resources:

Would you like support on this topic?

Complete the form below with a brief description of your project and one of our consultants will get back to you.